Page 11 - advanced-photoshop-magazine
P. 11
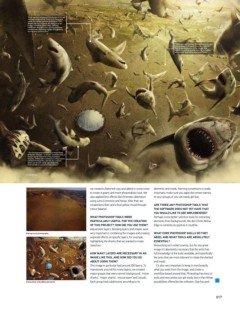
“After we had rendered the sharks in CG, we started compositing them into the scene using the render passes technique. This allows you to compose all aspects of an image including direct light, diffuse, reflection and specular, giving you more control over blending modes and opacity during post-production.” “Once we had finished the composition and integration of all elements, we created a flattened duplicate of the image and started working on the effects, including chromatic aberration and lens flares.” “The background was created from three different images – a desert satellite view, a beach aerial view and a mountainous skyline. These were combined using masks created from paths, and all the colours were corrected using Color Balance, Channel Mixer and Hue/Saturation.” © Gui Christ we created a flattened copy and added in some noise elements and needs. Naming conventions is really to create a grainy and more photorealistic look. We important; make sure you apply the correct names also applied lens effects like chromatic aberration to your groups or you can easily get lost. using Lens Correction and Noise. After that, we created lens flare and a final yellow mood through ARE THERE ANY PHOTOSHOP TOOLS THAT colour balance. THE SOFTWARE DOES NOT YET HAVE THAT YOU WOULD LIKE TO SEE IMPLEMENTED? WHAT PHOTOSHOP TOOLS WERE Perhaps some better selection tools for extracting PARTICULARLY USEFUL FOR THE CREATION elements from backgrounds. We don’t think Refine OF THIS PROJECT? HOW DID YOU USE THEM? Edge is currently as good as it could be. Adjustment layers, blending layers and masks were Background photography very important in combining the images and creating WHAT CORE PHOTOSHOP SKILLS DO THEY separate effects on specific layers; for example, NEED, AND WHAT TOOLS ARE ABSOLUTELY highlighting the sharks that we wanted to make ESSENTIAL? stand out. Retouching isn’t rocket science, but for any great image it’s absolutely necessary that the artist has HOW MANY LAYERS ARE NECESSARY IN AN full knowledge of the tools available, and specifically IMAGE LIKE THIS, AND HOW DID YOU GO the ones that are most relevant to create the desired ABOUT USING THEM? end result. This image in particular had around 200 layers. To It’s also very important to keep in mind exactly manoeuvre around this many layers, we created what you want from the image, and create a major groups that were named ‘background’, ‘minor workflow based around that. Photoshop has tons of sharks’, ‘major sharks’, ‘rescue team’ and ‘clouds’. tools and new artists can get easily lost in the infinite Colouration and adding elements Each group had subdivisions according to its possibilities offered by the software. Stay focused. 017